Look closely on both sides of my cheek :P They are both the same :P
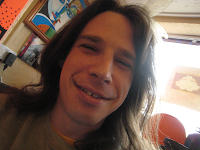
How to Clone and Treat a Photo
I knew I wanted to duplicate the the "silly impression of my mouth corner", to make the impression seem more REAL as like in the film. During the hole process, I accidently horizontally flipped it and I actually felt it helped to remind me I was working duplicating the cut on the other side, here is how I did it.
- Locked the original photo.
- Created a new layer.
- Clone copied the face that I wanted, made sure the brush was at the right size to just copy only the face part of the scar.
- Once the cloned area into new layer, it will be a circled area.
- Rotated the area using the "Rotate tool" to roughly match the other side, doesn't have to match properly.
- Magic selected the new layer and then trimmed the edge of the circle to match my ORIGINAL edge of my face.
- Changed the mode to "Value" and set the Opacity to 74.3 to help merge the colors to be similar.
- Use the smudge tool with the default settings and carefully smudge the inner circle and the outside of the face smoothly match my ORIGINAL face. Don't overly smudge, only just till no outstanding edging is visible.
- Use the brightness and contrast tool to match the lighting of the other side.
That is all.
Note about flipping in Gimp
There is "Image->Tranform" and "Layer->Transform" be sure to use the apporiate one, as one of them flips all layers.

